Managing WooCommerce Products – Part I of II
September 4, 2018
The Importance of Creative Design in Business
December 24, 2018If you want to edit content on WordPress, then you have to be logged into your dashboard. Once you’ve logged in, follow these simple steps to edit WordPress page content.
- The site back-end (administration area) of your website is where the important content creation – not to mention editing – happens. The default location of this area of your website is http://www.WebsiteName.com/wp-admin. Enter your log in information to get started.

- You’ll be presented with the administration dashboard and a column menu to the left when logged in. The content of the website is organized under the Pages or Posts section. Our article will look at pages, but the two are essentially the same thing when it comes to editing. Click on Pages to see the existing pages, and click Add New to create new pages.

- If you want to edit an already existing page, then hover over the Page Title in the list to open the editing links. Click on Edit to make changes to the page.

- WordPress offers Text and Visual modes for editing. Visual Mode shows you an approximation of what the published content will look like, and has formatting options for things such as bold and italics. Feel free to experiment with the different controls, safe in the knowledge you can undo any changes you make.

Text mode allows users to directly edit the HTML code that controls the styles, media, overall layout, and more of a web page. Text mode is for advanced users, and will likely be confusing to those not versed in HTML. check out a resource such as w3school’s HTML Introduction.

- You can add images to the page with the Add Media button, which opens up the Insert Media dialogue box. You’ll see the images that have already been uploaded to your Media Library, as well as an upload button that lets you choose new images. WordPress comes with a simple drag-and-drop interface, or you can click Select Files to open up a dialogue box for choosing files from your hard drive. You can also drag-and-drop several items at once.

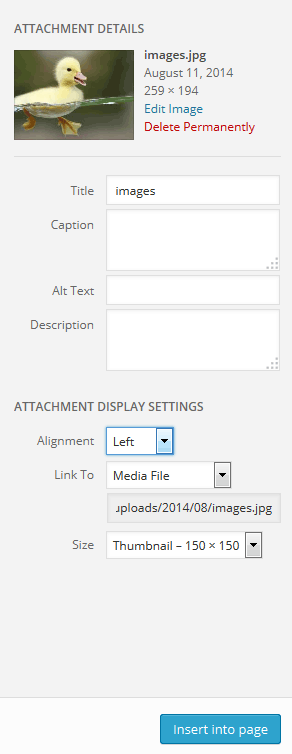
- The Attachment Details pane will appear to the right for every image. This allows you to choose a caption for the image, alt text (which appears when images don’t load) and a description. These are all optional things though, and more often than not the extra information is unnecessary.
The ATTACHMENT DISPLAY SETTINGS control how your image will appear on the page. Alignment is self-explanatory, and text will flow around the image if there is adequate space. “Link to” sets the behavior when the user clicks the image. This is handy for using a smaller thumbnail that flows with the content, but allows the user to view the full-resolution image as needed. Size determines how big of a thumbnail to generate for the content. If you select Full Size, the image will not be scaled. If you select Full Size, be aware it might not fit on the page nicely. I recommend setting Link To to None when inserting full-size images, as it is redundant.
- The Attachment Display Settings allow you to change how the image appears on the website. The alignment options are self-explanatory, and text flows around an image whenever there is enough space. Link To decides when happens when users click images. It’s a handy option for putting a small thumbnail that better flows with content on a site, where users can click on it to get a full size image. Be aware that an image won’t scale properly, and could unbalance a page, if set to Full Size. When you’ve made all the necessary changes, click on Insert into Page to have the image, well, inserted into the page.
When finished, click Insert into page to do exactly that.

- After completing all of your editing, save the changes with the Publish button to the top-right. Save Draft allows you to save the changes you’ve made without actually publishing them to the website. This allows you to make edits later on before actually putting it up.

Don’t forget to log-out every time you want exit your dashboard. Any questions or comments, drop us an email to admin@brandingexperts.com.au
Reference: Xmission


